
Connecting
AWS Site-to-Site VPN 구성 방법 본문
Site-to-Site VPN
Amazon VPC로 시작하는 인스턴스는 자체(원격) 네트워크와 통신할 수 없습니다. AWS Site-to-Site VPN연결을 생성하고 연결을 통해 트래픽을 전달하도록 라우팅을 구성하여 VPC에서 원격 네트워크에 대한 액세스를 활성화할 수 있습니다.
개념
다음은 Site-to-Site VPN의 주요 개념입니다.
- VPN 연결: 온프레미스 장비와 VPC 간의 보안 연결입니다.
- VPN 터널: 데이터가 고객 네트워크에서 AWS와 주고받을 수 있는 암호화된 링크입니다. 각 VPN 연결에는 고가용성을 위해 동시에 사용할 수 있는 두 개의 VPN 터널이 포함되어 있습니다.
- 고객 게이트웨이: 고객 게이트웨이 디바이스에 대한 정보를 AWS에 제공하는 AWS 리소스입니다.
- 고객 게이트웨이 디바이스: Site-to-Site VPN 연결을 위해 고객 측에 설치된 물리적 디바이스 또는 소프트웨어 애플리케이션입니다.
- 대상 게이트웨이(Target gateway): 사이트 간 VPN 연결의 Amazon 측 VPN 엔드포인트를 일컫는 일반적인 용어입니다.
- 가상 프라이빗 게이트웨이(Virtual private gateway): 가상 프라이빗 게이트웨이는 단일 VPC에 연결할 수 있는 사이트 간 VPN 연결의 Amazon 측 VPN 엔드포인트입니다.
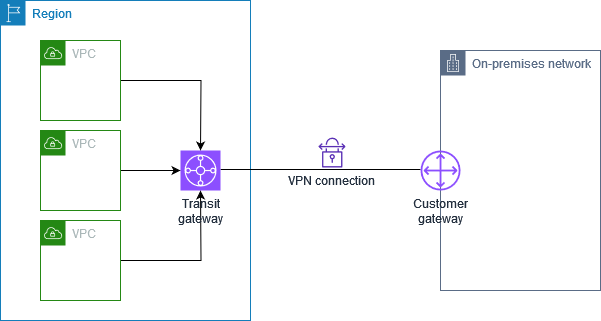
- 전송 게이트웨이(Transit gateway): 사이트 간 VPN 연결의 Amazon 측 VPN 엔드포인트로 여러 VPC와 온프레미스 네트워크를 상호 연결하는 데 사용될 수 있는 전송 허브입니다.
AWS에서 Site-to-Site를 구성할 수 있는 방식은 VGW, TGW를 활용한 2가지 방법입니다.
가상 프라이빗 게이트웨이
- Site-to-Site VPN 연결의 Amazon 측에 있는 VPN 집선기입니다. 가상 프라이빗 게이트웨이를 생성하여 Site-to-Site VPN 연결에 액세스해야 하는 리소스가 포함된 VPC에 연결합니다.
-
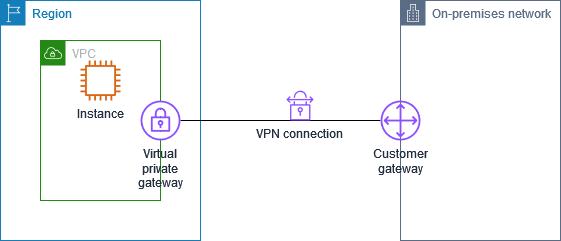
- 가상 프라이빗 게이트웨이를 생성할 때 Amazon 측 게이트웨이의 프라이빗 자율 시스템 번호(ASN)를 지정할 수 있습니다. ASN을 지정하지 않는 경우 가상 프라이빗 게이트웨이는 기본 ASN(64512)으로 생성됩니다. 가상 프라이빗 게이트웨이를 만든 후에는 ASN을 변경할 수 없습니다.
Transit Gateway
- 전송 게이트웨이는 VPC와 온프레미스 네트워크를 상호 연결하는 데 사용할 수 있는 전송 허브로, 이를 통해 Site-to-Site VPN 연결을 생성할 수 있습니다.
- 다음 다이어그램은 전송 게이트웨이를 사용하는 온프레미스 네트워크와 여러 VPC 간의 VPN 연결을 보여줍니다.
-
Openswan을 활용한 Site-to-Site VPN 구성
Openswan은 IPsec 기반의 VPN (Virtual Private Network) 솔루션을 위한 오픈 소스 소프트웨어입니다. Openswan은 두 네트워크 또는 네트워크와 개별 호스트 간의 보안된 터널을 생성하기 위해 사용됩니다.
Openswan은 IPsec 프로토콜을 사용하여 데이터 패킷을 암호화하고, 인터넷을 통해 안전하게 전송할 수 있게 합니다. 이는 사이트 간 VPN 구성이나 원격 액세스 VPN 연결에 유용합니다.
VPN 장비를 통해 구성하는 방식과 비교할때, Openswan을 구성하는 부분에서 차이가 있고 다른 부분에서는 동일하기 때문에 본 챕터에서는 Openswan을 활용하도록 하겠습니다.
이번에 사용하는 OS는 Amazon Linux2 입니다. Ubuntu OS를 사용하는 경우 strongSwan을 사용하시기 바랍니다.
먼저 고객게이트웨이 설정 → 가상 프라이빗 게이트웨이 설정 → VPN 구성을 진행합니다.

Openswan이 설치된 서버의 공인 IP주소를 확인하고 고객 게이트웨이를 생성합니다.

가상 프라이빗 게이트웨이 생성을 클릭하고 생성을 진행합니다.


가상 프라이빗 게이트웨이는 VPN과 연결될 VPC와 연결되어 있어야 함으로 작업에서 VPC를 Attache 해줍니다.

이제 Site-to-Site VPN 구성을 진행합니다. 이전에 생성한 CGW, VGW를 선택하고 정적 라우팅 옵션과 함께 VPN 서버 공인 IP를 입력합니다.

기본적으로 가용성을 위해 2개의 터널이 생성이 완료되며, 아직 Openswan 설정이 진행되지 않았기 때문에 터널은 다운 상태임을 확인할 수 있습니다.

Openswan 구성 파일을 다운로드합니다.

Amazon Web Services
Virtual Private Cloud

AWS utilizes unique identifiers to manipulate the configuration of
a VPN Connection. Each VPN Connection is assigned an identifier and is
associated with two other identifiers, namely the
Customer Gateway Identifier and Virtual Private Gateway Identifier.

Your VPN Connection ID                  : vpn-0daa64dd66f5d8b31
Your Virtual Private Gateway ID         : vgw-064c28df06c047ea3
Your Customer Gateway ID                : cgw-02c3b1ee827e7c4c5


This configuration consists of two tunnels. Both tunnels must be
configured on your Customer Gateway, but only one of those tunnels should be up at any given time.

At this time this configuration has only been tested for Openswan 2.6.38 or later, but may work with earlier versions.


--------------------------------------------------------------------------------------------------------------------
IPSEC Tunnel #1
--------------------------------------------------------------------------------------------------------------------

This configuration assumes that you already have a default openswan installation in place on the Amazon Linux operating system (but may also work with other distros as well)

1) Open sudo vi and ensure that its values match the following:
   net.ipv4.ip_forward = 1
   net.ipv4.conf.default.rp_filter = 0
   net.ipv4.conf.default.accept_source_route = 0

2) Apply the changes in step 1 by executing the command 'sysctl -p'

3) Open /etc/ipsec.conf and look for the line below. Ensure that the # in front of the line has been removed, then save and exit the file.
    #include /etc/ipsec.d/*.conf

4) Create a new file at sudo if doesn't already exist, and then open it. Append the following configuration to the end in the file:
 #leftsubnet= is the local network behind your openswan server, and you will need to replace the <LOCAL NETWORK> below with this value (don't include the brackets). If you have multiple subnets, you can use 0.0.0.0/0 instead.
 #rightsubnet= is the remote network on the other side of your VPN tunnel that you wish to have connectivity with, and you will need to replace <REMOTE NETWORK> with this value (don't include brackets).

conn Tunnel1
    authby=secret
    auto=start
    left=%defaultroute
    leftid=43.200.173.45
    right=43.202.94.160
    type=tunnel
    ikelifetime=8h
    keylife=1h
    phase2alg=aes128-sha1;modp1024
    ike=aes128-sha1;modp1024
    auth=esp -> remove
    keyingtries=%forever
    keyexchange=ike
    leftsubnet=10.188.0.0/16
    rightsubnet=192.168.16.0/20
    dpddelay=10
    dpdtimeout=30
    dpdaction=restart_by_peer

5) Create a new file at /etc/ipsec.d/aws.secrets if it doesn't already exist, and append this line to the file (be mindful of the spacing!):
43.200.173.45 43.202.94.160: PSK "vo9hzMqoYYmQ.dzsGOWkb2fzTLRgetbR"


--------------------------------------------------------------------------------------------------------------------
IPSEC Tunnel #2
--------------------------------------------------------------------------------------------------------------------

This configuration assumes that you already have a default openswan installation in place on the Amazon Linux operating system (but may also work with other distros as well)

1) Open /etc/sysctl.conf and ensure that its values match the following:
   net.ipv4.ip_forward = 1
   net.ipv4.conf.default.rp_filter = 0
   net.ipv4.conf.default.accept_source_route = 0

2) Apply the changes in step 1 by executing the command 'sysctl -p'

3) Open /etc/ipsec.conf and look for the line below. Ensure that the # in front of the line has been removed, then save and exit the file.
    #include /etc/ipsec.d/*.conf

4) Create a new file at /etc/ipsec.d/aws.conf if doesn't already exist, and then open it. Append the following configuration to the end in the file:
 #leftsubnet= is the local network behind your openswan server, and you will need to replace the <LOCAL NETWORK> below with this value (don't include the brackets). If you have multiple subnets, you can use 0.0.0.0/0 instead.
 #rightsubnet= is the remote network on the other side of your VPN tunnel that you wish to have connectivity with, and you will need to replace <REMOTE NETWORK> with this value (don't include brackets).

conn Tunnel2
    authby=secret
    auto=start
    left=%defaultroute
    leftid=43.200.173.45
    right=52.79.185.154
    type=tunnel
    ikelifetime=8h
    keylife=1h
    phase2alg=aes128-sha1;modp1024
    ike=aes128-sha1;modp1024
    auth=esp
    keyingtries=%forever
    keyexchange=ike
    leftsubnet=10.188.0.0/16
    rightsubnet=192.168.16.0/20
    dpddelay=10
    dpdtimeout=30
    dpdaction=restart_by_peer

5) Create a new file at /etc/ipsec.d/aws.secrets if it doesn't already exist, and append this line to the file (be mindful of the spacing!):
43.200.173.45 52.79.185.154: PSK "39gPEGX7mPQX3g8JydcNNQd9oVdkFD8J"


--------------------------------------------------------------------------------------------------------------------
(OPTIONAL CONFIG) Tunnel Healthcheck and Failover
--------------------------------------------------------------------------------------------------------------------

Openswan does not provide a built-in tunnel failover functionality. However, there are some third-party workarounds to this.

=== DISCLAIMER ===
Please be aware that AWS is in no way responsible for any of the use, management, maintenance, or potential issues you may encounter with the third-party workarounds. It is strongly recommended that you thoroughly test any failover solution prior to implementing it into your production environment


  Additional Notes and Questions
  - Amazon Virtual Private Cloud Getting Started Guide:
        http://docs.amazonwebservices.com/AmazonVPC/latest/GettingStartedGuide
  - Amazon Virtual Private Cloud Network Administrator Guide:
http://docs.amazonwebservices.com/AmazonVPC/latest/NetworkAdminGuide- auth=esp 제거
- overlapip=yes 추가
- leftsubnet: IDC 측 VPC 혹은 네트워크 대역
- rightsubnet: AWS VPC 대역
설정을 진행하고 sudo systemctl restart ipsec.service를 진행하면, 자동으로 VPN 상태가 업데이트 됩니다.

VPN 서버가 EC2 환경에서 설치되어 있다면 목적지가 자신이 아니더라도 트래픽을 수신받을 수 있도록 아래와 같이 변경해줘야 합니다.
Local Server의 VPN 역할을 수행할 수 있도록변경이 완료되면 라우팅 테이블로 상대측 IP 대역으로 전송될 수 있도록 수정합니다.


이후 VPN과 연결되어야 하는 라우팅 테이블에 접속하여 라우팅 전파 옵션을 클릭합니다.

라우팅 전파를 활성화 해야 VPN에서 구성한 정적 경로 사설 IP 대역이 전달됩니다.


정상적으로 구성이 완료 되었다면 터널이 Up 상태로 변경된 것을 확인할 수 있습니다.
'네트워크 ' 카테고리의 다른 글
| 라운드로빈 DNS (Round-Robin DNS) (2) | 2021.04.13 |
|---|---|
| IoT 통신 네트워크 (0) | 2019.06.24 |
| VPN (Virtual Private Network) 알아보기 (0) | 2019.01.01 |
| 2018 VMware vForum (0) | 2018.12.14 |
| QUIC (Quick UDP Internet Connection) 개념 (2) | 2018.12.02 |