
Connecting
Apache 리버스 프록시 SSL 셋팅하기 본문
Apache2 Reverse Proxy Setting
- Setting Environment
- Ubuntu Server 18.04.1 LTS
- Apache2 2.4.29
Reverse Proxy
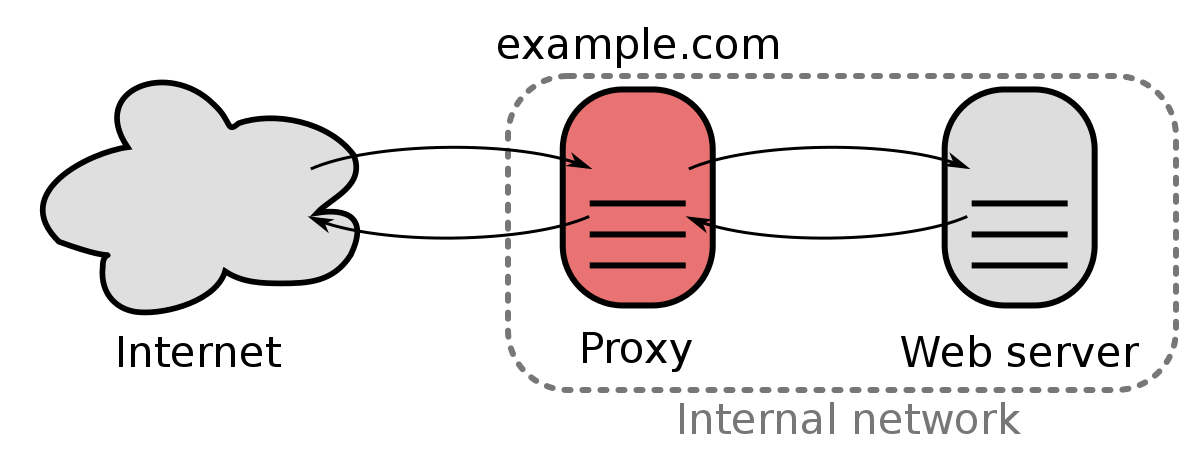
- 리버스 프록시는 외부 네트워크에서 접속 요청이 들어왔을 때, 해당 요청을 내부 서버로 전달하는 중계기 역할을 담당합니다.
- 실제 운영중인 서버가 외부에 직접 노출되지 않고 Private Network에서 동작하기 때문에 보안이 향상되며, 프록시 서버에 인증 기능을 갖추는 경우도 있습니다.
- 로드 밸런싱의 역할을 담당함으로서, URL에 따라 서버를 분기하며, 정적 콘텐츠를 캐싱하여 웹서버에 부하를 줄이는 역할을 담당합니다.
Software
Squid
Apache

Lighttpd

Varnish Cache

Nginx

Install Server
위와 같이 다양한 오픈소스 소프트웨어를 통해서 리버시 프록시 기능을 구현할 수 있으며, 본 연구실에서는 Apache를 활용하여 구성을 진행하도록 하겠습니다.
설치환경은 ESXi 6.5 기반에 Ubuntu Server 18.04.1 LTS Version을 사용하였습니다.
- 우분투 서버 버전은 다음 링크에서 받을 수 있습니다.
설치가 완료되면 SSH를 통해 서버에 접속하고 다음과 같이 기본 환경 설정을 진행합니다.
$ sudo apt update && sudo apt upgrade -y
$ sudo apt install nmap git nload build-essential -y
$ sudo dpkg-reconfigure tzdata
    Asia/Seoul
$ sudo reboot
다음 명령을 실행하여 Apache를 설치하고 리버시 프록시 사용을 위한 설정을 진행합니다.
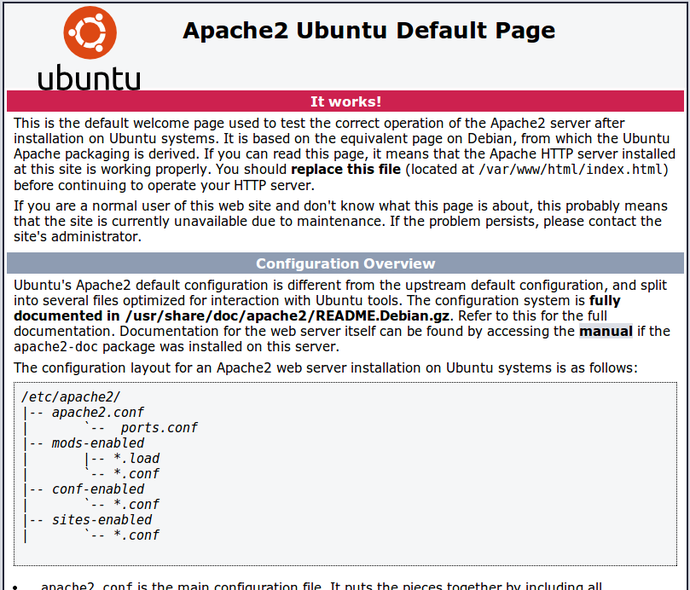
$ sudo apt install apache2 -y
$ nmap localhost

Starting Nmap 7.60 ( https://nmap.org ) at 2018-10-04 16:27 KST
Nmap scan report for localhost (127.0.0.1)
Host is up (0.00011s latency).
Other addresses for localhost (not scanned): ::1
rDNS record for 127.0.0.1: localhost.localdomain
Not shown: 997 closed ports
PORT    STATE SERVICE
22/tcp  open  ssh
80/tcp  open  http
443/tcp open  https # SSL 미설정시 보이지 않을 수 있음.

$  sudo systemctl status apache2
● apache2.service - The Apache HTTP Server
   Loaded: loaded (/lib/systemd/system/apache2.service; enabled; vendor preset: enabled)
  Drop-In: /lib/systemd/system/apache2.service.d
           └─apache2-systemd.conf
   Active: active (running) since Thu 2018-10-04 06:09:55 KST; 10h ago
  Process: 5396 ExecStop=/usr/sbin/apachectl stop (code=exited, status=0/SUCCESS)
  Process: 6370 ExecReload=/usr/sbin/apachectl graceful (code=exited, status=0/SUCCESS)
  Process: 5401 ExecStart=/usr/sbin/apachectl start (code=exited, status=0/SUCCESS)
 Main PID: 5417 (apache2)
    Tasks: 55 (limit: 4915)
   CGroup: /system.slice/apache2.service
           ├─5417 /usr/sbin/apache2 -k start
           ├─7428 /usr/sbin/apache2 -k start
           └─7429 /usr/sbin/apache2 -k start
웹 브라우저로 접속시 다음과 같은 화면이 뜨면 정상적으로 설치된 것입니다.
다음은 Apache에서 Reverse Proxy 설정을 위한 모듈을 활성화 합니다.
$ sudo a2enmod proxy proxy_http proxy_balancer lbmethod_byrequests rewrite deflate headers proxy_balancer proxy_connect proxy_html proxy_wstunnel proxy_balancer lbmethod_byrequests

$ sudo systemctl restart apache2
Let's Encrypt - Free SSL/TLS Certificates
SSL 인증서를 설정하기 위하여 무료 SSL/TLS Certificates 서비스인 Let's Encrypt으로 인증서를 받아보겠습니다.
서버에는 반드시 도메인 주소가 등록되어 있어야 합니다.
- freenom
- gandi
- cloudflare
certbot을 다음과 같이 설치합니다.
$ sudo apt update
$ sudo apt install software-properties-common
$ sudo add-apt-repository ppa:certbot/certbot
$ sudo apt update && sudo apt upgrade -y
$ sudo apt-get install python-certbot-apache -y
와일드카드로 서브도메인을 동록하기 위해서는 다음과 같이 입력합니다.
$ sudo certbot -a dns-plugin -i apache -d "*.example.com" -d example.com --server https://acme-v02.api.letsencrypt.org/directory연구실에서 사용하는 gandi 도메인의 경우 와일드카드를 아직 지원하지 않기 때문에 서브 도메인을 직접 등록합니다.
sudo certbot --apache -d example.com -d www.example.com- 짧은 시간 반복적으로 키를 발급받을 경우 일시적으로 키 발급이 중지됩니다.
- https://www.sslshopper.com/ssl-checker.html
- 위의 사이트에서 발급받은 도메인에 SSL 인증서가 정상적으로 등록되었는지 확인합니다.
Reverse Proxy Setting
디렉토리를 이동하여 리버스 프록시 셋팅을 진행합니다.
$ cd /etc/apache2/sites-available/
$ sudo vi 000-default.conf
<VirtualHost *:80> ServerName example.com ServerAlias www.example.com ServerAdmin contact@example.com RewriteEngine On RewriteCond %{HTTPS} off RewriteRule (.*) https://%{HTTP_HOST}%{REQUEST_URI} ErrorLog ${APACHE_LOG_DIR}/example-error.log CustomLog ${APACHE_LOG_DIR}/example-access.log combined </VirtualHost> <VirtualHost *:443> ServerName example.com ServerAlias www.example.com ServerAdmin contact@example.com ProxyRequests Off SSLProxyEngine on ProxyPreserveHost On AllowEncodedSlashes NoDecode <Proxy *> Order deny,allow Allow from all </proxy> SSLEngine on SSLProxyVerify none SSLProxyCheckPeerCN off SSLProxyCheckPeerName off SSLProxyCheckPeerExpire off SSLCertificateFile "/etc/letsencrypt/live/example.com/cert.pem" SSLCertificateKeyFile "/etc/letsencrypt/live/example.com/privkey.pem" SSLCertificateChainFile "/etc/letsencrypt/live/example.com/chain.pem" ProxyPass / http://127.0.0.1:8100/ nocanon ProxyPassReverse / http://127.0.0.1:8100/ RequestHeader set X-Forwarded-Proto "https" RequestHeader set X-Forwarded-Port "443" ErrorLog ${APACHE_LOG_DIR}/example-error.log CustomLog ${APACHE_LOG_DIR}/example-access.log combined </VirtualHost>파일을 수정한 다음에는 Apache에 해당 파일을 등록하는 절차를 진행해야 합니다.
$ sudo a2ensite 000-default.conf
& sudo systemctl restart apache2
다른 서브 도메인에 대해서도 위와 같은 방법으로 conf 파일을 생성하고 저장합니다.
Certbot 인증서를 삭제하고자 할 때는 다음과 같이 입력한다.
$ sudo certbot delete --cert-name example.com
troubleshooting
시스템 재시작시 오류가 발생한 경우 해당 로그를 확인하여 오타나 해당 모듈을 활성화 했는지 확인합니다.
에러로그 파일은 다음에서 볼 수 있습니다.
$ cd /var/log/apache2/
$ cat error.log
'개발' 카테고리의 다른 글
| PART 1 Build a fault tolerant system (0) | 2019.10.10 |
|---|---|
| CI/CD Concept (2) | 2019.01.11 |
| SCOUTER 간단 사용설명서 (0) | 2018.06.27 |
| 운영체제 교착상태 및 메모리 관리 (0) | 2018.06.07 |
| Jersey를 활용한 RESTful 이해하기 (6) | 2018.06.03 |
